A New Journey
May, 2024, Palmdale, CA. The beginning…
It’s time for a change…
In May, 2024 I picked up a 1964 Ford Econoline van to turn into a traveling story van. My hope is to build this out to allow me to go on the road for a few days at a time to take photographs and collect stories. I love these boxy, old, weird vans as they give me enough room to carry my camera equipment as well as to have the space to sleep while I’m on the road. I have been receiving more and more requests for stories, so it is time for me to dive more deeply into this and really commit more time to creating work that I’m proud of. I also plan to share more on my website as the stories there are getting more and more visits (nearly 30K to the Rolling Bones story alone!).
My photography and writing has taken me on wonderful and unexpected journeys. What began as a simple way to fulfill my creative yearnings and passions has led to something more. My work is hanging in homes, galleries and collections worldwide and I have had the honor of photographing and writing for magazines like HOT ROD Magazine, Magneto Magazine, SpeedHolics, Hop Up Magazine, Looking Glass Magazine and others. I never had a plan for this, this was all just a passion project to feed my creative soul but it seems to have become more. I am humbled and honored to have these opportunities and it is time for the next step in my photography and writing so that I can get closer, spend more time with, and explore subjects more personally.
This page will be the story of the ’64 Econoline build and progress as it happens.
I will be looking for sponsors to help make this happen as there is much to do to bring this to life. If you or a company you know might be interested to sponsoring parts of this build, please contact me at tim.scott@scottphoto.co (not .com) so that we can discuss ways to make this worthwhile for you. I will include a list of things that will be needed for this build as it progresses. See below for more.
I want to thank you all for your support, kind words and interaction over that past few years that have allowed this to even be possible! I will be reaching out to this amazing community of passionate friends to see what you might be interested in seeing and reading about as I plan my story calendar for the future. Let’s have some fun and find some new adventures together.
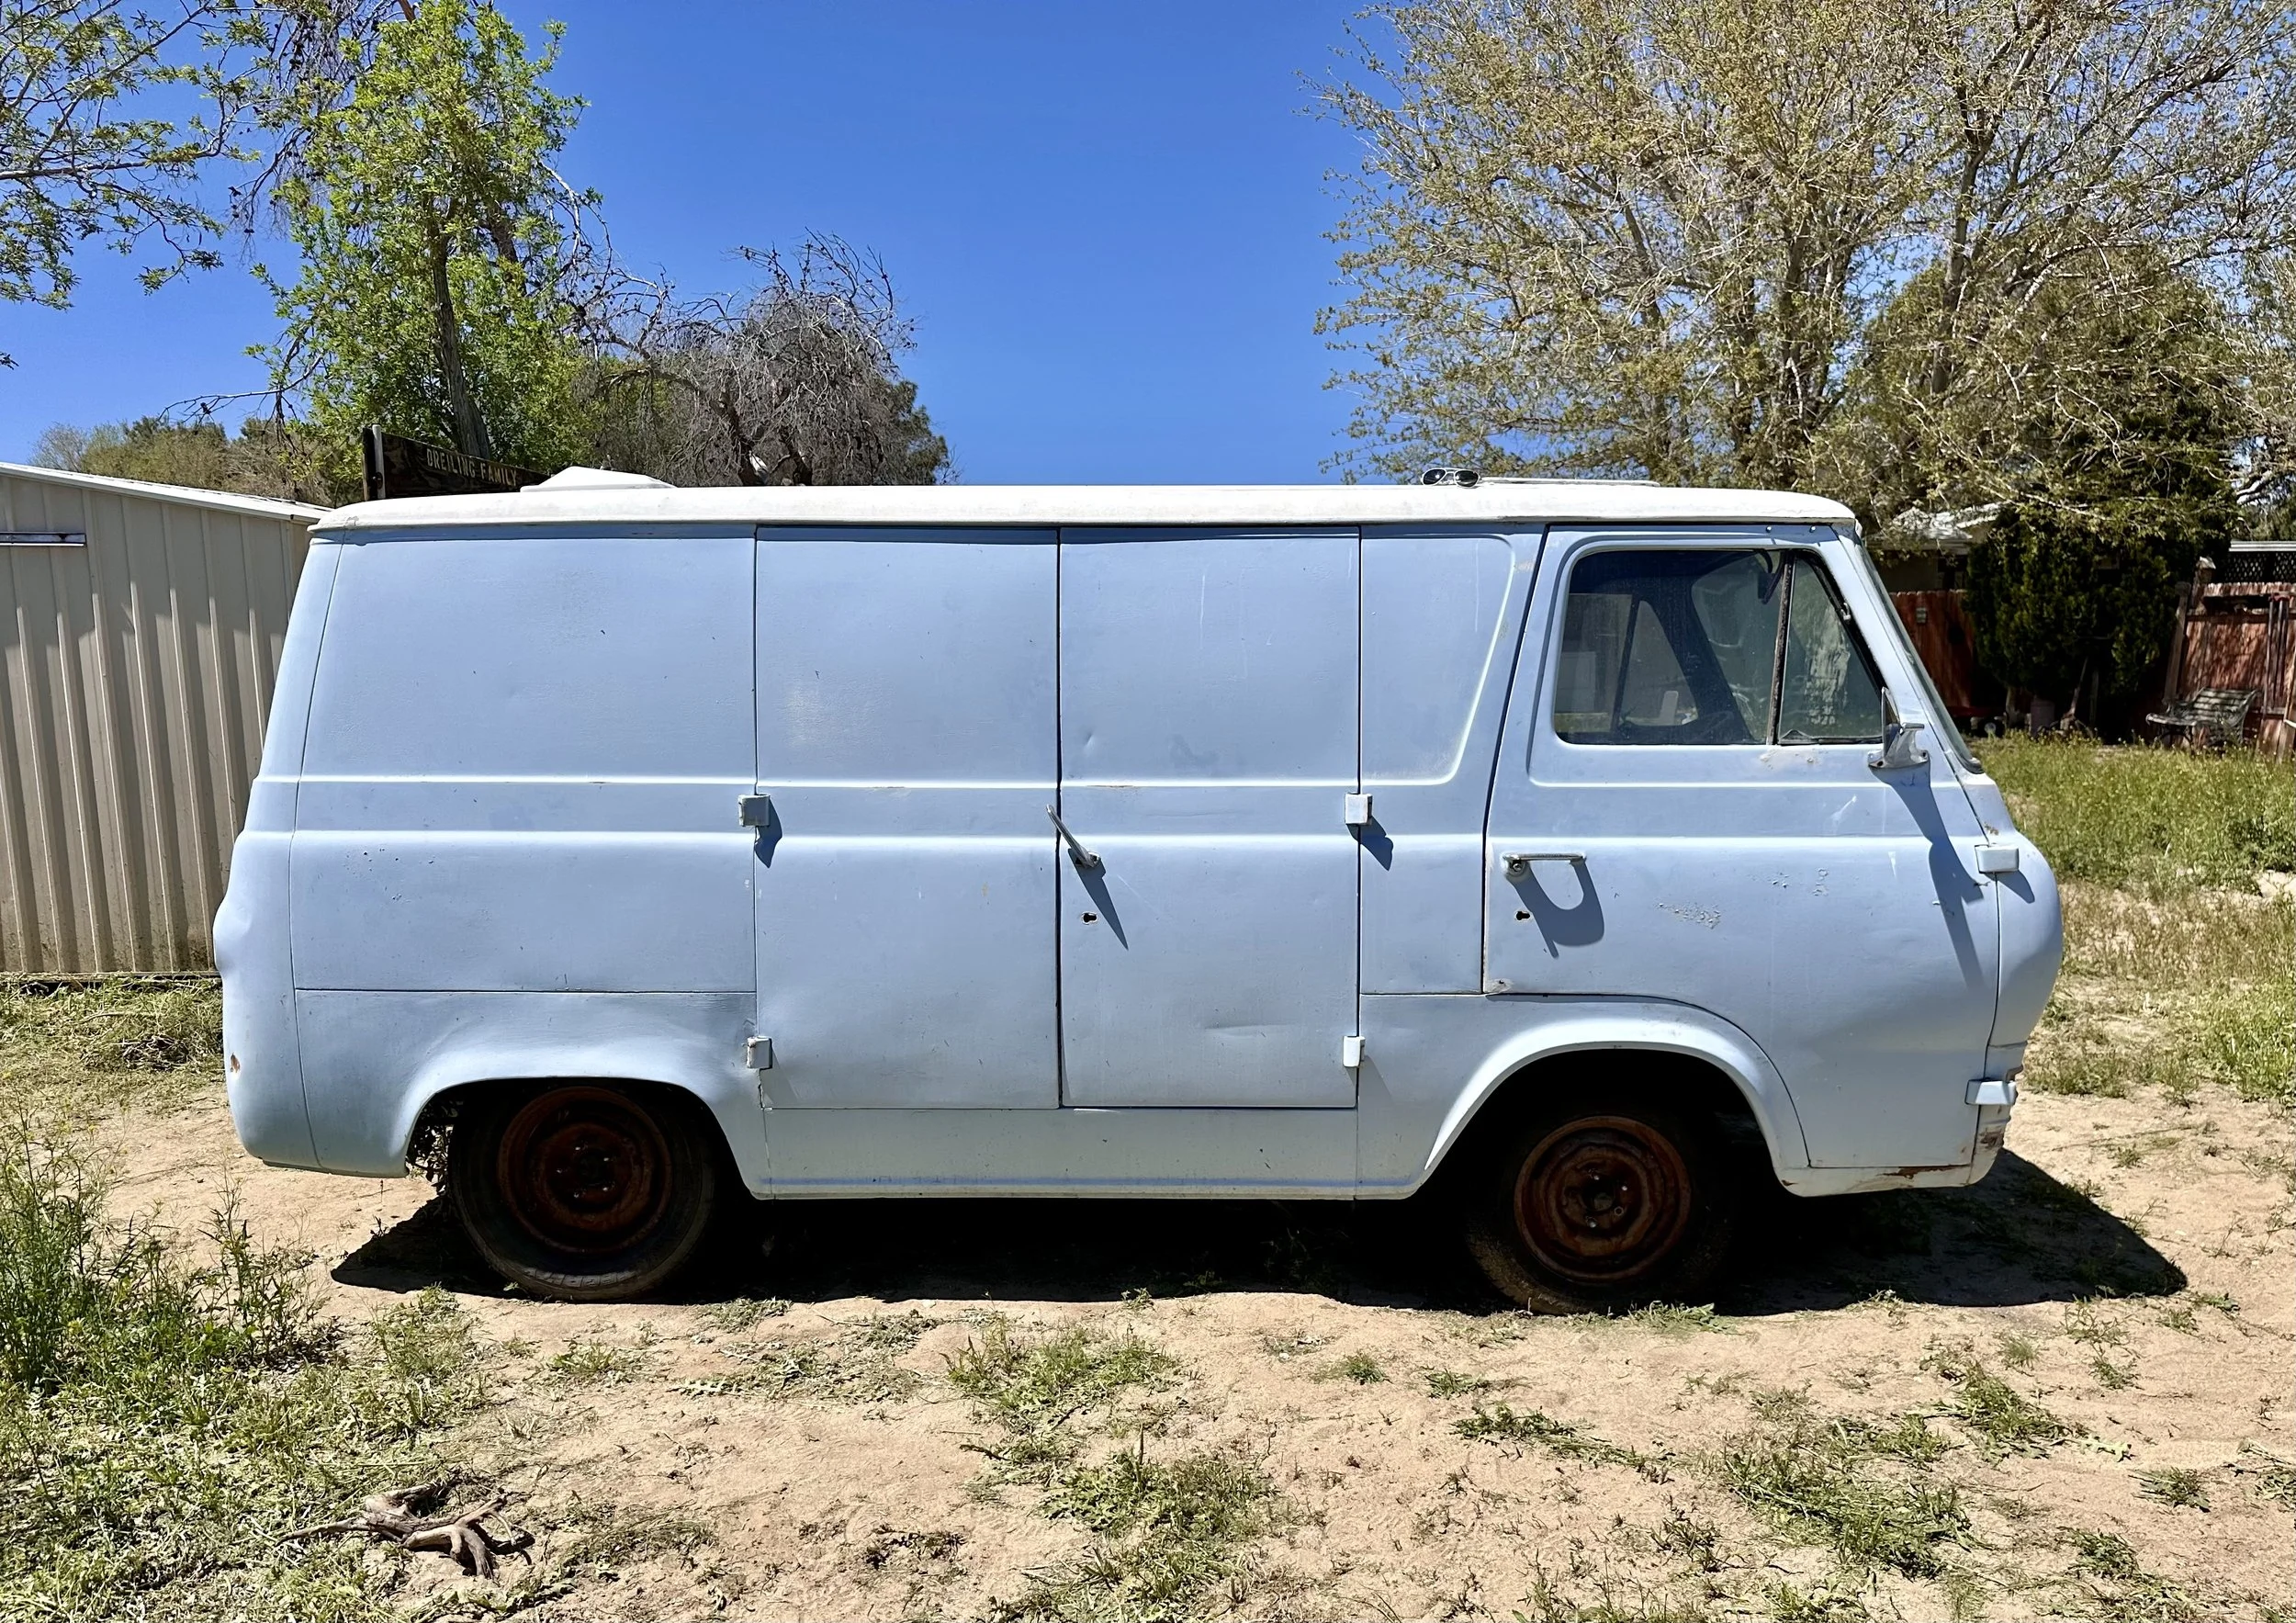
1964 Ford Econoline
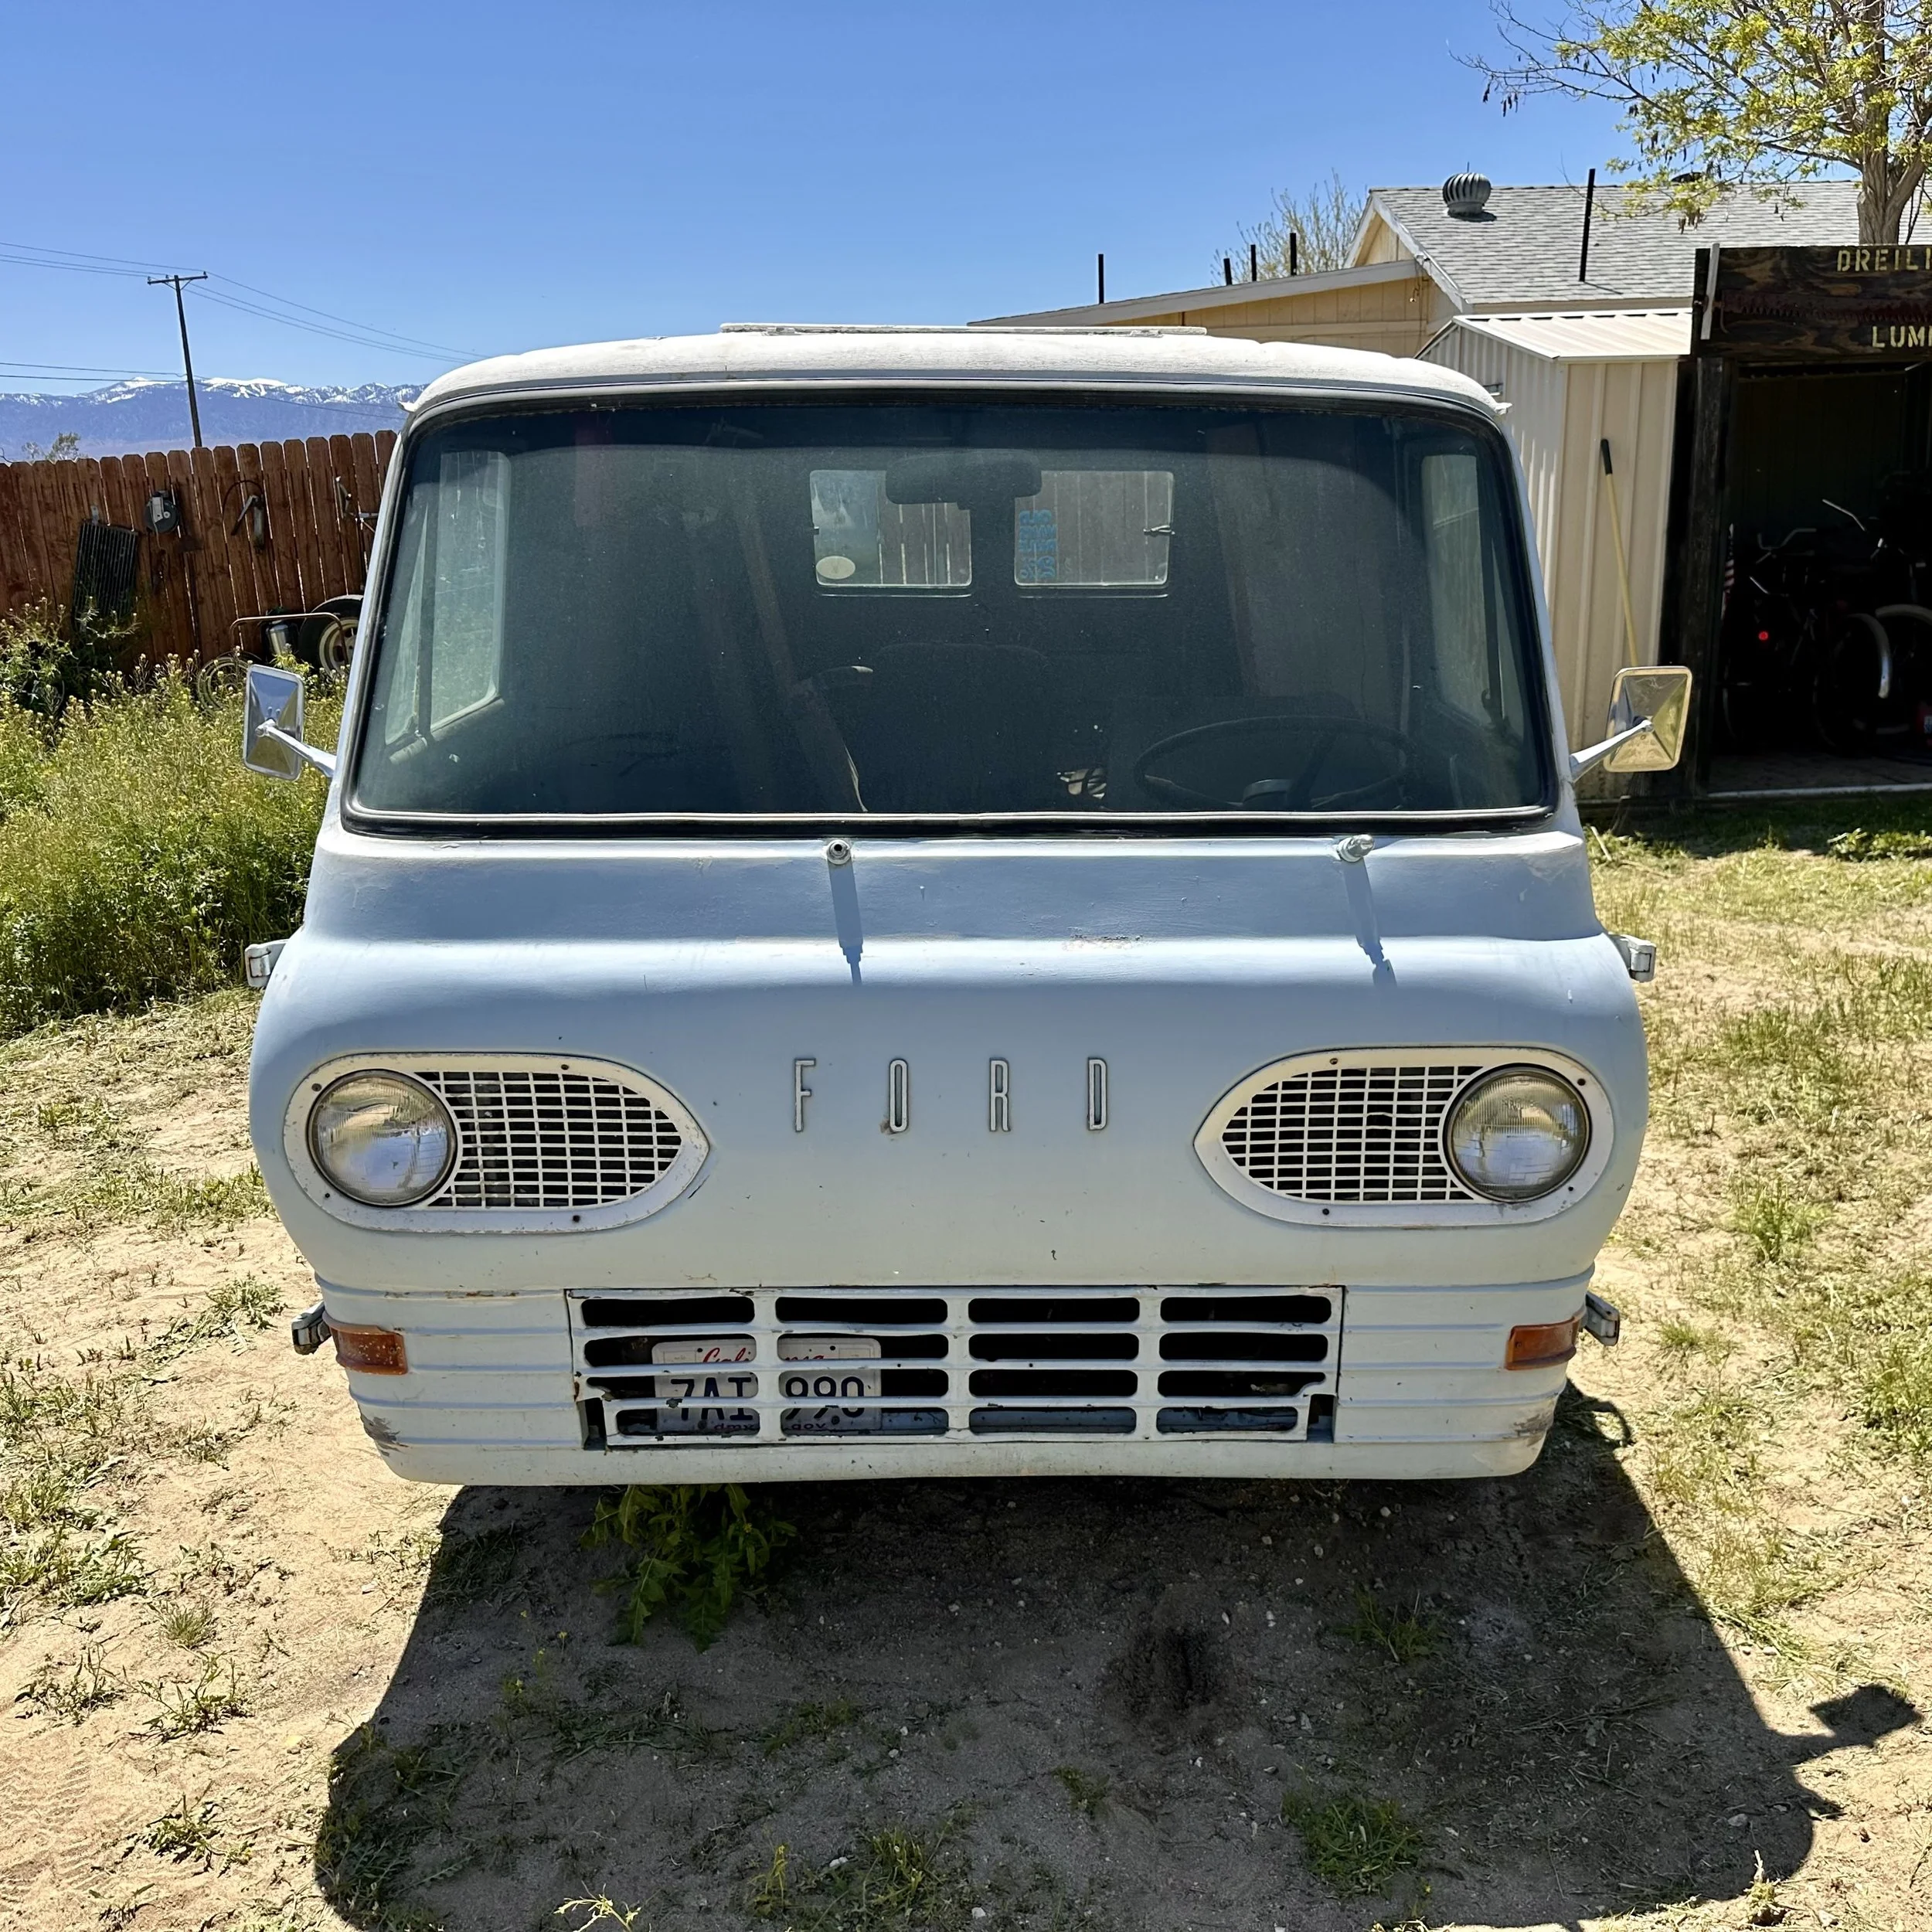
This is the Econoline the day I picked it up from the previous owner. I found the van on Facebook Marketplace and it was located about 20 minutes past the El Mirage dry lake bed.
The Plan
Stage 1 – Lots of love
Let me be clear – I am no mechanic. I have some basic knowledge and lots of tools but I will be learning as I go and relying on friends and community. Please be patient with me.
My first goal for this project is to get it moving (safely) under its own power. To that end I have started with the basics: engine, driveline, and brakes.
I am going to go with a small inline six for this build as that should allow me to achieve manageable gas mileage while giving me good reliability and access to parts and repairs if needed. I don’t need fast of flashy. I need reliable and cost effective for multiple day/week trips.
I have the original 170 inline 6 currently in the van though it is not running, and I don’t know what condition it is in. It turns over by hand but as the starter was missing, I have not done a compression test yet. The distributor needs a bit of work, and the carburetor needs to be rebuilt. It has the stock 3-speed (three on the tree) which I plan to keep to also help with gas milage. Slow, steady and reliable are fine with me. I also have a 200 inline 6 that I’m planning on a full rebuild for a long-term solution.
What is needed
Parts and more parts. I am collecting small parts that are missing from the van or needed to make progress. I will list these below.
I will also need a few bigger things for this stage and would love to find a sponsor to help with those. All ideas are welcome!
Big(er) needs:
DONE – Thank you ABS Powerbrakes!
Front disc brake conversion
ABS Power Brake - https://abspowerbrake.com/collections/econolineCarburetor (Autolite 1100 1BBL or Holley 1940
Tires and wheels - 14” (Or 15”. Not sure yet.)
Stage II needs:
Upholstry
Paint and body
Interior build-out
Ongoing smaller needs:
Wiring Harness
Radiator hoses
Radiator testing
Gas tank pressure testing
Rubber seals for doors and windows – Steele Rubber Products or Dennis Carpenter(?)
Wednesday, June 12, 2024
This is not sexy or exciting. For the past weeks it feels like I haven’t been doing anything except cleaning, wire-brushing, parts hunting and other really mundane stuff. Any of you who have done this before know what I’m talking about.


As I mentioned earlier, my first goal is to get this moving and stopping safely. I am currently focussed on the driveline and engine. Here’s what I’ve accomplished so far:
Rear drum brakes completely rebuilt
Gas tank dropped for cleaning and pressure testing
Stock 9” wire-brushed, drained and refilled with fresh 80-90
Stock 3-Speed transmission cleaned up, drained and refilled with 80-90
Stock 170 Inline-6 cleaned up a bit and inspected for missing/needed parts. Oil drained and refilled with fresh 15-40
Purchased and installed a new starter and battery
Welded up a panel in the rear where someone previously had begun cutting a hole above the rear axle for some reason
Bought and mounted 2 used tires for the rear so that this would be at least a roller. The front tires are a bit sketchy but they at least hold air. 4 tires will be on the agenda in the future!
Tracked down and sourced a lot of small parts: driver’s sun visor, stock rearview mirror, new window handles, new lock cylinders, door straps, floor mount heater, rear license plate light, front door panels, and more.
A new Tuff-Stuff 1-wire alternator has arrived and is ready to be installed once the new brackets arrive.
The ignition system is kind of a mess so I have new points, condenser, rotor, cap and coil to install.
Both front and rear stock bumpers installed. They’re clunky and ugly but I think they kind of suit the van.
The fine folks as C&E Lumber and Hardware are probably tired of me coming in for nuts, bolts and other random stuff. SO much more to do but day by day I continue to work through my ToDo list!
Wednesday, June 26, 2024
Well, it has been a few weeks since my last update. A lot of really mundane work has happened and a few really exciting (for me anyway) things have happened.
First, the exciting stuff. I have a few sponsors to announce who are supporting this build and, quite honestly, making this possible.

Hanford Auto Supply
I have known Timmy McMaster for several years now. I first met Timmy when I was on a road trip with The Rolling Bones from Bonneville to El Mirage. One of the hot rods had an issue and Ken called Timmy. Tim drove 213 miles from his shop in Hanford, CA to meet us in Adelanto, CA (just outside of El Mirage) to bring parts. He and a few of the Rolling Bones Circus crew tore into the car in the parking lot of the hotel and they fixed it that night so that the adventures could continue the next day. This is the kid of guy Timmy McMaster is. It has been my honor to photograph him several times since then and I a blessed to call him a friend.
In the near-future, I will be working with Timmy/Hanford Auto Supply to do the build on the engine for the Econoline. I will have so much more confidence driving the many hundreds of miles I plan to knowing that someone with this knowledge, expertise and experience has done his magic to the engine. Thank you, Timmy! I am looking forward to working with you!

ABS Power Brake
One of the major components of this build and one of the most important things to me was being able to stop (I live in SoCal, this is vital!). The 4-wheel drum brakes left much to be desired. So I rebuilt the rear drums and found ABS Powerbrake. This company was recommended by a friend and Master Mechanic as he had worked with them on many projects.
ABS Power Brake, Inc. has been in the brake and power steering rebuilding business since 1993. ABS has been there to see the latest from manufacturers like GM, Ford, Chrysler even our friends in Europe and Japan. ABS Power Brake has been committed to providing quality rebuilt products and will continue, thanks to you our valued customers.
Because of our customers, we have been put to the challenge to correct most of the problems we have experienced with our classics, hot rods and customs. Most of the time the biggest problem we have with our classics is that the equipment is mismatched. That's where ABS Power Brake, Inc. comes in. We have gone through all the research and development so you don't have to go through all the headaches of trying to find the correct equipment for that special application.
Brakes, it's all about power. How many times have you heard about applying a larger rotor or caliper, for better stopping? Any time you go larger, you're going to need muscle (more pressure at the wheels). We have proved this many times with our American made specialty products.
What ever your application may be from classic truck to custom rod, ABS Power Brake, Inc. will do what ever it takes to provide the correct American made product for your classic custom.
They built a custom kit for my Econoline and I picked it up earlier this week. I haven’t installed anything yet but wow, all of the parts and pieces are a quality and craftsmanship that you rarely see nowadays. I can’t wait to start installing this and I will add updates as I make progress. Thank you ABS! Check them out if you need anything brake or steering related here: https://abspowerbrake.com.
Super Secret Sponsor/Collaboration
There is another sponsor/collaborator in the works that I am super excited to be working with! I can’t announce yet who/what that is but trust me, it’s super cool and will have a very significant impact on this build. More to come soon.
Beyond all of this there has been a lot of small progress that is tedious and slow (finding missing parts, cleaning and painting parts, tracking down small parts – see pattern here?) but it feels like things are coming together and I am stupid excited about this project!
Thank you all for your support, private messages and for following along. More soon…
Tuesday, July 9, 2024

The long, slow process and the kindness of strangers
My last update was on June 26th and I have been steadily working almost every day for a few hours on this project. As I am not a mechanic so much of this is done by trial and error. Actually, that’s a really good way to describe my progress as trying to understand and get all of the details correct is veeeeeeerrrrry slow going and so much going back and forth to figure things out. Things that I think should take an hour end up taking four, and that’s not including the days and weeks finding and waiting for parts to arrive–and if I’m really lucky then they’re actually the correct parts.
I had a major learning moment a couple of weeks back when I was working on putting the fan, belt, alternator and pullies on the engine. I had assumed (you can see the error coming right here) that the engine was the original 170 straight-six. After fighting with pullies, spacing and fitment for a week I reached out to Fernando who is a professional mechanic and has built several Econolines to ask his advice. His first question, “Are you sure it’s a 170?”. !*^T%%TE!, duh. Looking at the numbers on the engine it is a ’68 200. I knew better and I didn’t pay attention. Major learning moment that cost me a ridiculous amount of time. I’d like to say that I’ll never make that mistake again, but, well, you know how that goes.
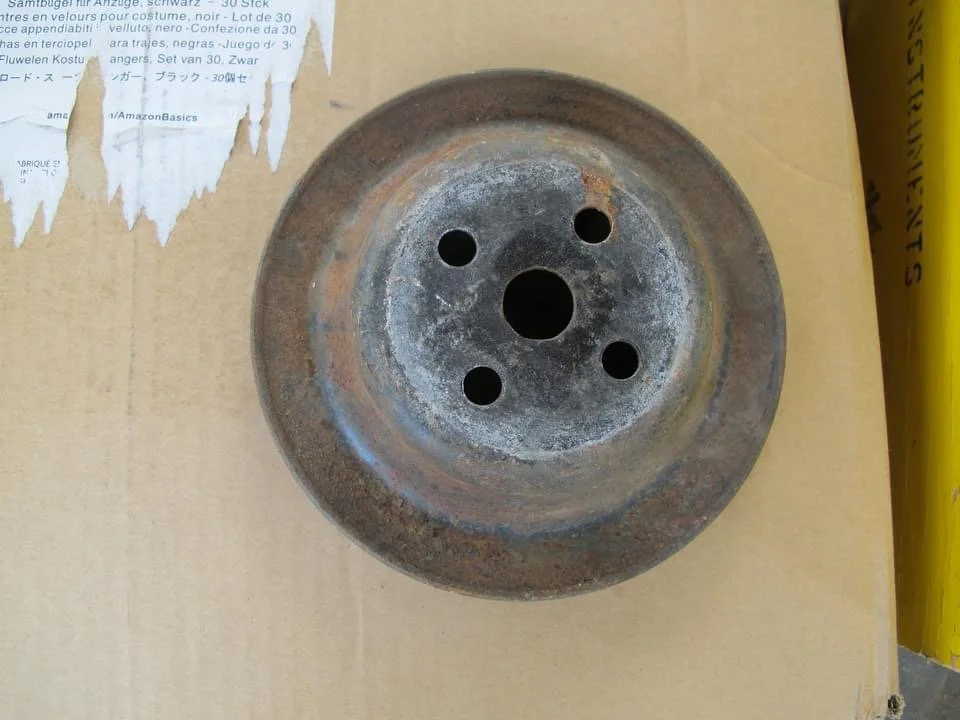
I was missing the water pump pully for the engine, so I posted in a Facebook Econoline group to see if anyone had one for sale. I received a private message from someone in Wyoming that I had never met who offered to send me one, free. He wouldn’t even accept postage costs for it. Sure enough, a box showed up a short time later with the pully I needed. A bit of time with a wire brush and a little paint later it looked as good as new. The kindness and offers of help from complete strangers are such an encouragement to me. With all of the fighting and tension in the world today this unexpected kindness is a spark of hope as I fight the feelings of fear and unease as I look to the future. These days we all need this so very much and I hope to be able to pass it on as I continue this journey. Thank you all.


Continuing on the engine, I was fighting clearance issues because the engine had a two-belt harmonic balancer pully on it–one more belt than I needed for this particular application, and the cause of my clearance issues. I thought about putting the word out again to find a used single-belt harmonic balancer, but I was wisely cautioned and encouraged to invest in a new one to avoid issues later. I am going to be very honest here, after making the decision to step back from my day job to pursue this dream it is a battle every day to make ends meet, so parts like this are a luxury and a choice between a part and something else I need in my daily life is a very conscious decision. I am so thankful for my wife, Rachel, who is so encouraging and supportive of my pursuit of this dream. She works a full-time job and takes on additional work by teaching in prisons during the summer months. Never in my life have I had a partner who has been so kind, loving and supportive. I am a blessed man.
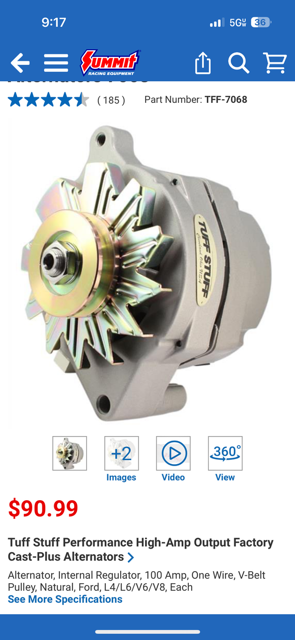
Ok, back to the harmonic balancer. I took the advice and ordered the part from Summit. I had never removed or installed a harmonic balancer before, so with the help of friends via text and several phone calls I dove right in. Fortunately, I had the correct tools to pull the harmonic balancer. (Side note: Thank god for air tools! My impact gun has helped so many times!) I didn’t want to screw anything up, so I really took my time with this process and it ended up taking me 3 hours just to get it off as I checked and rechecked my process every 3 seconds. When it came off cleanly, I was really excited (because I’m a dork and I love to learn new things)! I borrowed an installing tool from my local O’Rileys and moved to the install phase. Again, too many hours later the new harmonic balancer was on and the pullies all seem to align so I am hoping that I did everything right!


I installed the new 1-wire, 100-amp alternator from Tuff Stuff. It took me a while to find the right brackets (finally found at a Ford Falcon part supply specialist) but after much wire-brushing and cleaning I seem to have it installed and secure. I know next to nothing about wiring so that is an upcoming adventure. I have purchased some of the cables needed for this, but nothing is completely installed yet.


One wiring issue that I had to tackle was grounding. My friend-and-often-voice-of-reason-mechanical-advisor, Mike, told me that I needed to make sure the engine was grounded correctly. Looking at the existing set-up there were no ground straps from the engine to the body or frame. I ordered straps and attached 2 (they felt a little flimsy, so I used two) from the engine to the frame. Again, a 4+ hour job as I fumbled my way through this. There were no appropriate holes in the frame where I wanted to mount the straps, so I drilled through the frame to mount a bolt. Using a battery powered hand drill, this was a time-consuming process. Lying on my back on a creeper under van it was difficult to get any leverage and the metal of the frame is solid, so this took quite a while. But I now have two grounding straps from the engine to the frame (it’s a unibody so I think this should suffice).
I was awaiting some parts, and the gauge cluster caught my eye, so I disconnected the only 4 wires still connected and took it apart. Many years of dirt and dust were in every corner and crevasse. Back to the wire brush and lots of cleaning. The gauges cleaned up pretty well, the main backing plate after cleaning and priming looked pretty much new and the glass only had a couple of stained areas the wouldn’t clean up. The metal cover looked pretty rough to begin with surface rust all over, but after a lot of wire brushing it actually started looking really good. I was going to paint it, but I really don’t know what the final design plan is for the interior yes so I just left it in bare metal and rubbed on some Gibbs lubricant to protect the metal and put it all back together. I tracked down all new mounting screws and put it back in the dash. It is not wired at all yet, but it makes me smile every time I see it.


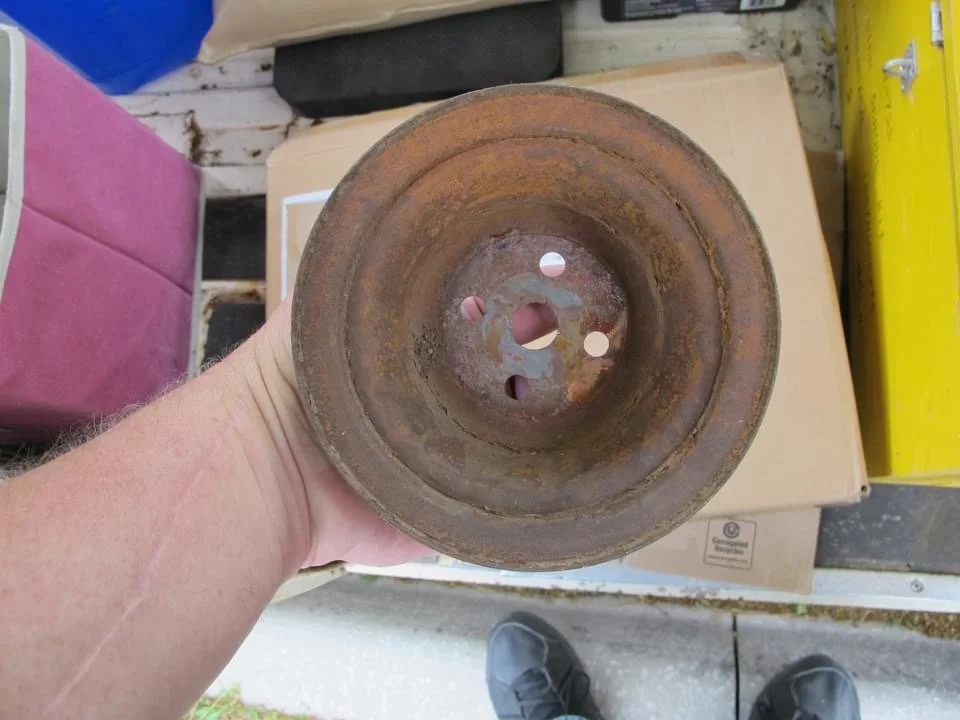
Oh, I also wire brushed, cleaned and painted all four of the 14” rims. Sometimes simple jobs like this just feel productive, so I just did it.


There is more that I have accomplished but honestly, it’s feeling like a bit of a slog. So much work for so many things that most people will never notice makes it feel like very little progress is being made. I know it is, but I really want to hear this thing run and go for a drive! To do that I need to get some basic wiring done, wrap up the motor (put on the belt, put the distributor together, test spark, fuel and compression) oh, and rebuild or replace the carb. I also need to install the new front disc brake kit from ABS Brakes & Steering and test and tune all four corners of the brakes. More on that next time. Until then, one little step at a time (and lots and lots and lots of scraping, cleaning and wire brushing…
Coming soon: Front brake upgrade, transmission bushing replacement, and yet more scraping, cleaning and wire brushing.
Wednesday, July 24, 2024
September 1st, 2024. This is my goal date to have this Econoline moving under its own power and stopping as it should.
I am beginning to get to the part of this project where it’s feeling like a slog. While I am getting quite a bit done, and certainly a lot of important things, I am reaching the end of my knowledge and skill set and will need some help very soon. But in the meantime, here is what I have been able to accomplish in the past couple of weeks.
Keep in mind, I haven’t done any of this before so everything takes me a lot longer than it probably should. The way I’m looking at it is that when things need work in the future, I will have already done it, and it will (hopefully) way easier!
Transmission bushing


The Econoline transmission is suspended from the frame with a single contact point that has a rubber bushing. The bushing that was there had collapsed and pretty much glued itself to the mount. I spent quite a bit of time searching for an original replacement but that was quite futile. Time to be creative.


A few weeks back a friend turned me on to Energy Suspension. In addition to modern replacement parts, they also offer a lot of other measure-and-modify-to-fit options. They also make their bushing out of something they call “Hyper-Flex® Polyurethane”. It is supposed to be more stable and longer lasting than traditional rubber. After carefully measuring the space where the bushing fits, I ordered the closest size to the bushing that I could find on their website. In my case it was the Energy Suspension 9.9484G Universal Link Flange Type Bushing. Time to get some other work done while I waited for this to arrive.


I did not disconnect the transmission from the engine, nor the driveline from the transmission for this work. I put a jack under the transmission, raised it enough to take the weight off the support, removed the ½” retaining bolt, and lowered the whole mechanism just enough to clear the bushing, (about 2 ½ inches) and put jack stands under everything for safety. Then I spent 5 hours under the van fighting with it. I don’t give up easy.
Getting the old bushing out was way more difficult than I imagined. The rubber had melted and bonded to the housing like hot gum on an old tennis shoe that had been sitting for 10 years. Much swearing and countless up and downs from the creeper to the toolbox later I finally resorted to drilling out the rubber so that I could pull the metal sleeve out of the middle of the super sticky rubber. An hour later it finally let go. Now I was left with rubber residue all around the metal housing where the new bushing would need to go. I still can’t believe how much this small layer of rubber fought me! I scraped, I cut, I filed and still had rubber left on the metal. !^$E&^$#&!!! I finally attempted to use metal grinding bits with my air tool to very carefully grind down the majority of the residual rubber while not damaging the metal surround. About 2 ½ hours later it was as clean as I was going to get it.
All that was left of the old bushing after the battle


I re-measured the space for the bushing and confirmed that the universal replacement bushing was about 2mm too big for the space. I knew that this was the case when I ordered it but now it was time to figure out how to make it fit. In the kit that I ordered from Energy Suspension there were parts for two complete bushings, so I knew if I really screwed one up, I’d have another chance.
The only way I could think of to take material off of a round bushing was using the bench grinding wheel. The key was to take a little material off while slowly turning the bushing to keep it round. So, I began – one rotation, measure, one rotation measure – you get the picture. It was messy and there was polyurethane dust everywhere, but I finally got to the exact measurement needed–just enough for a snug fit. I am a complete dork, but I was very proud that I had figured this out and found a way to make it work. Little successes like this help to keep me going when I feel discouraged.


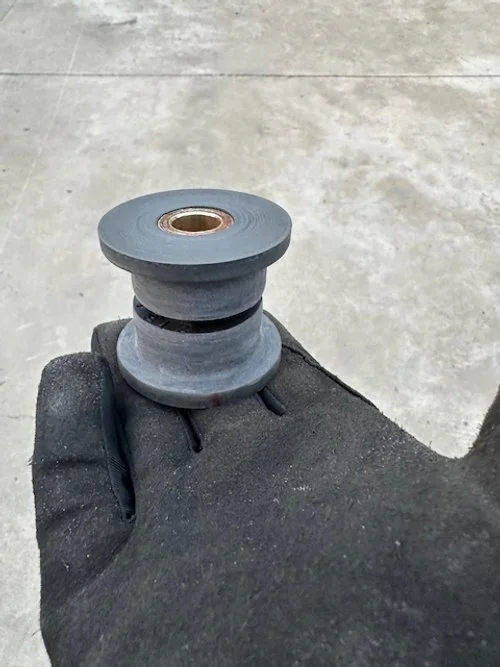
I then squeezed in the new bushing, inserted the metal center support and jacked the transmission back into place. While the new bushing isn’t exactly like the OEM, it seems to actually fit better. There are rubber ears on the outside of the bushing that fit perfectly on the outside edge of the transmission mount and work as polyurethane spacers between the transmission and the mount. I had purchased new grade 8 hardware and put the ½” bolt, lock washer and new nut on. Of course, I put the lock washer on the wrong (bolt) side, so after direction from friends I had to take it apart, again, and do it correctly. Lesson learned and job complete. Phew.


PLEASE NOTE: The photos above show the WRONG way to put the lock washer on. After I made these photos I took it all apart and added the lock washer on the nut end. Sigh.
Front Disc Brake Upgrade
I have been looking forward to this part a long time! I have said this before and I’m sure that I’ll say it again, I have never done anything like this before, but I love to learn.
For my birthday in June, I not-so-subtly hinted to my amazing wife that I really wanted a disc brake kit for the Econoline. Well, being the kind, understanding woman that she is, she “surprised” me by funding the kit. I had narrowed my options down to two; D&D Econo Disc Brakes based in Oregon and ABS PowerBrake based in SoCal. Both companies offer a very complete kit and have good reputations. ABS offers a system with a power booster, and they also will custom build a kit to your needs, so that was attractive to me. D&D is oft mentioned and recommended on the interwebs so that was a big bonus for them. I reached out to D&D a couple of times and didn’t hear anything back. I also heard that the wait time was quite long, though I can’t confirm that.
Fernando, a master mechanic who has worked on Econolines for years, recommended ABS Powerbrake and contacted a friend of his at ABS and they put together a special 4-piston kit just for me. When I picked it up, I was impressed with the quality of every component. The welding was beautiful, the 4-piston, Kelsey Hayes remanufactured calipers looked brand new, the booster/master cylinder set-up was specifically designed for the ’61-’67 Econolines, the remote reservoir and all the components looked great. I had no idea what to do with it all but it sure was nice!


While my booster and master cylinder look like the one above, the rest of the kit is slightly different as ABS built a kit specific to my needs. Call them directly for more info: (714) 771-6549


My first task was to remove the old disc brakes from the front of the ’64. Not too scary as I had just rebuilt the rear discs. On the driver’s side everything came apart as expected. The passenger side was another story. The drum would NOT release from the hub no matter what I tried. It wasn’t frozen to the pads as it did spin, but it would not come off no matter what I tried – hammer – fail – prybar – fail – lots of f-bombs – fail. The following day after exhausting every option I could think of I butchered the hell out of it with a cutting wheel. I fought the drum, and I won, but it wasn’t pretty. It looked like a 5-year-old got their hands on power tools, but I got it off! Turns out the there was a 3mm deep ridge in the drum and pad that would not let the drum slide off, even with the adjusting mechanism fully loosened. If you look at the pictures, you’ll understand. I have no idea how this happened. Maybe one of you does? So again, about 6 hours later I finished a 30-minute job. That’s the story of this build so far!


While cleaning and inspecting everything I noticed that the tie-rod boot was ripped on the passenger side. Crap. Time to learn something else new. After talking to friends and much research I decided to just replace the boot as the tie-rods looked fairly new and solid. Again, Energy Suspension to the rescue! They offer a huge variety of sizes, and after some careful measurements I found something that would work. I ordered the parts and while I waited, I had to learn how to separate the tie-rod so that I could replace the boot.

I have a lot of tools, but I had no idea how to separate the tie rod end. My buddy Mike said I needed something called a Pickle Fork (haha). Ok, seriously, that’s what it is called. After a little bit of internet sleuthing I found that I could rent/borrow one from my local auto parts store or I could buy a “15/16” Air Ball Joint Separator” from Harbor Freight. Harbor Freight for the win! $12.99 + 10.25% California sales tax and I was in business. It fit perfectly into my impact air gun and after about 27 seconds of negotiation the joint came free. I removed the split dust boot, put on the new boot and re-attached everything and inserted a new cotter pin. Easier than I thought. I sometimes wonder if I will get this van all back together and put in gear and everything will all fall apart like an old Laurel and Hardy bit. I guess we’ll see…

Don’t worry, the photo above was just to see the new dust boot. I did add the required cotter pin as the next step.
Ok, NOW I can start installing the new disc brake kit that I have no idea how to do.


Step 1: watch as many YouTube videos as possible so you have an idea of what you need to do. Honestly, looking at the videos it sure looked a lot easier to install disc brakes than the complete rebuild of the drum brakes that I had recently completed on the rear. I wasn’t very confident that I knew what I was doing so I decided to do a “soft install”. All that means was that I took all the parts and put them on with no grease or final torquing just to make sure that everything went together as expected. Actually, it was smoother than I expected, and everything fit perfectly – the backing plate fit, the rotor sat as it should and the caliper cleared the rotor exactly as it should. Yay! Now to take everything apart again and install it as complete.


The grease in my grease gun was ancient so I went on the hunt for fresh grease. Who knew that there were so many options? I loaded my grease gun and packed my wheel bearings. How the hell are you supposed to work with all of this grease and not get any on your pristine new rotors? Somehow, I managed to get the rear bearings packed and installed without tainting the rotors and tapped the bearing seal in completely. I greased the spindle liberally and then greased the front bearing. After bolting the mounting bracket and torquing appropriately I slid the rotor on the spindle, set the front bearing in, followed by the retaining washer and castle nut. Carefully setting the castle nut to a firm enough tightness to allow the wheel to spin but have a touch of pre-set tension and no slop was a guessing game, but I think I got it right. One cotter pin and dust cap later and it is all looking good.


One thing I forgot to mention earlier is that I took the time to paint the new brackets and calipers before I installed them. I do want these to look as good as possible for a long time. Is “caliper paint” really necessary? I don’t know, but I used that for the calipers anyway just to be safe. You won’t even see the calipers as I am just running OEM style steel wheels for now, but I painted the calipers silver and they look pretty much exactly the same as when I got them. But they’re protected from the elements at least.


After installing the bracket and rotor, I set the caliper in place and added the spacers and grade 8 bolt and lock washer provided with the kit. Next, on to the passenger side and repeat the process. I’m not really a happy dance kind of guy but I have to admit that I was really proud of how everything came together. The ABS kit came together so perfectly even a complete newbie like me could install it.


I still have to install the booster/master cylinder and figure out where the remote reservoir will live but that adventure will be in another update because I haven’t even thought about it yet!

Next Steps
I still have a lot to do before I have this running and driving but I’m trying to spend at least 2-3 hours every evening working toward that September 1st goal. I may be begging for help soon as I completely exhaust my skill set.
What I’m working on now is:
Tracking down an original ’61-’66 Autolite 1100 carburetor. There are some very specific requirements that I am learning about from some really knowledgeable people that have been kind enough to help me through an Econoline message board. More to come on that.
Installing the aluminum radiator that came in a pile of parts with the van.
Finding and installing wheels and tires on the front. I will share more in the next update but the 14” rims that came with the van don’t clear the new disc brakes.
All of this and a hundred other little things. More to come.
A huge thank you and shout out to:
ABS Powerbrakes for their support on this build. I am not required to say nice things about companies, but I have been very impressed with everything I have used so far in this build.
Mike, Allen and Fernando for putting up with my hundreds of questions and random texts and I wander through this process.
My wife Rachel for the great birthday present and her support of my crazy plans and ambitions.
“Jay in CA” for sharing his vast knowledge of all things Econoline and specifically for guiding me as I look for the correct carburetor for this specific application. More on this soon.
All of you for your kind words, support and suggestions.
Wednesday, May 14, 2025
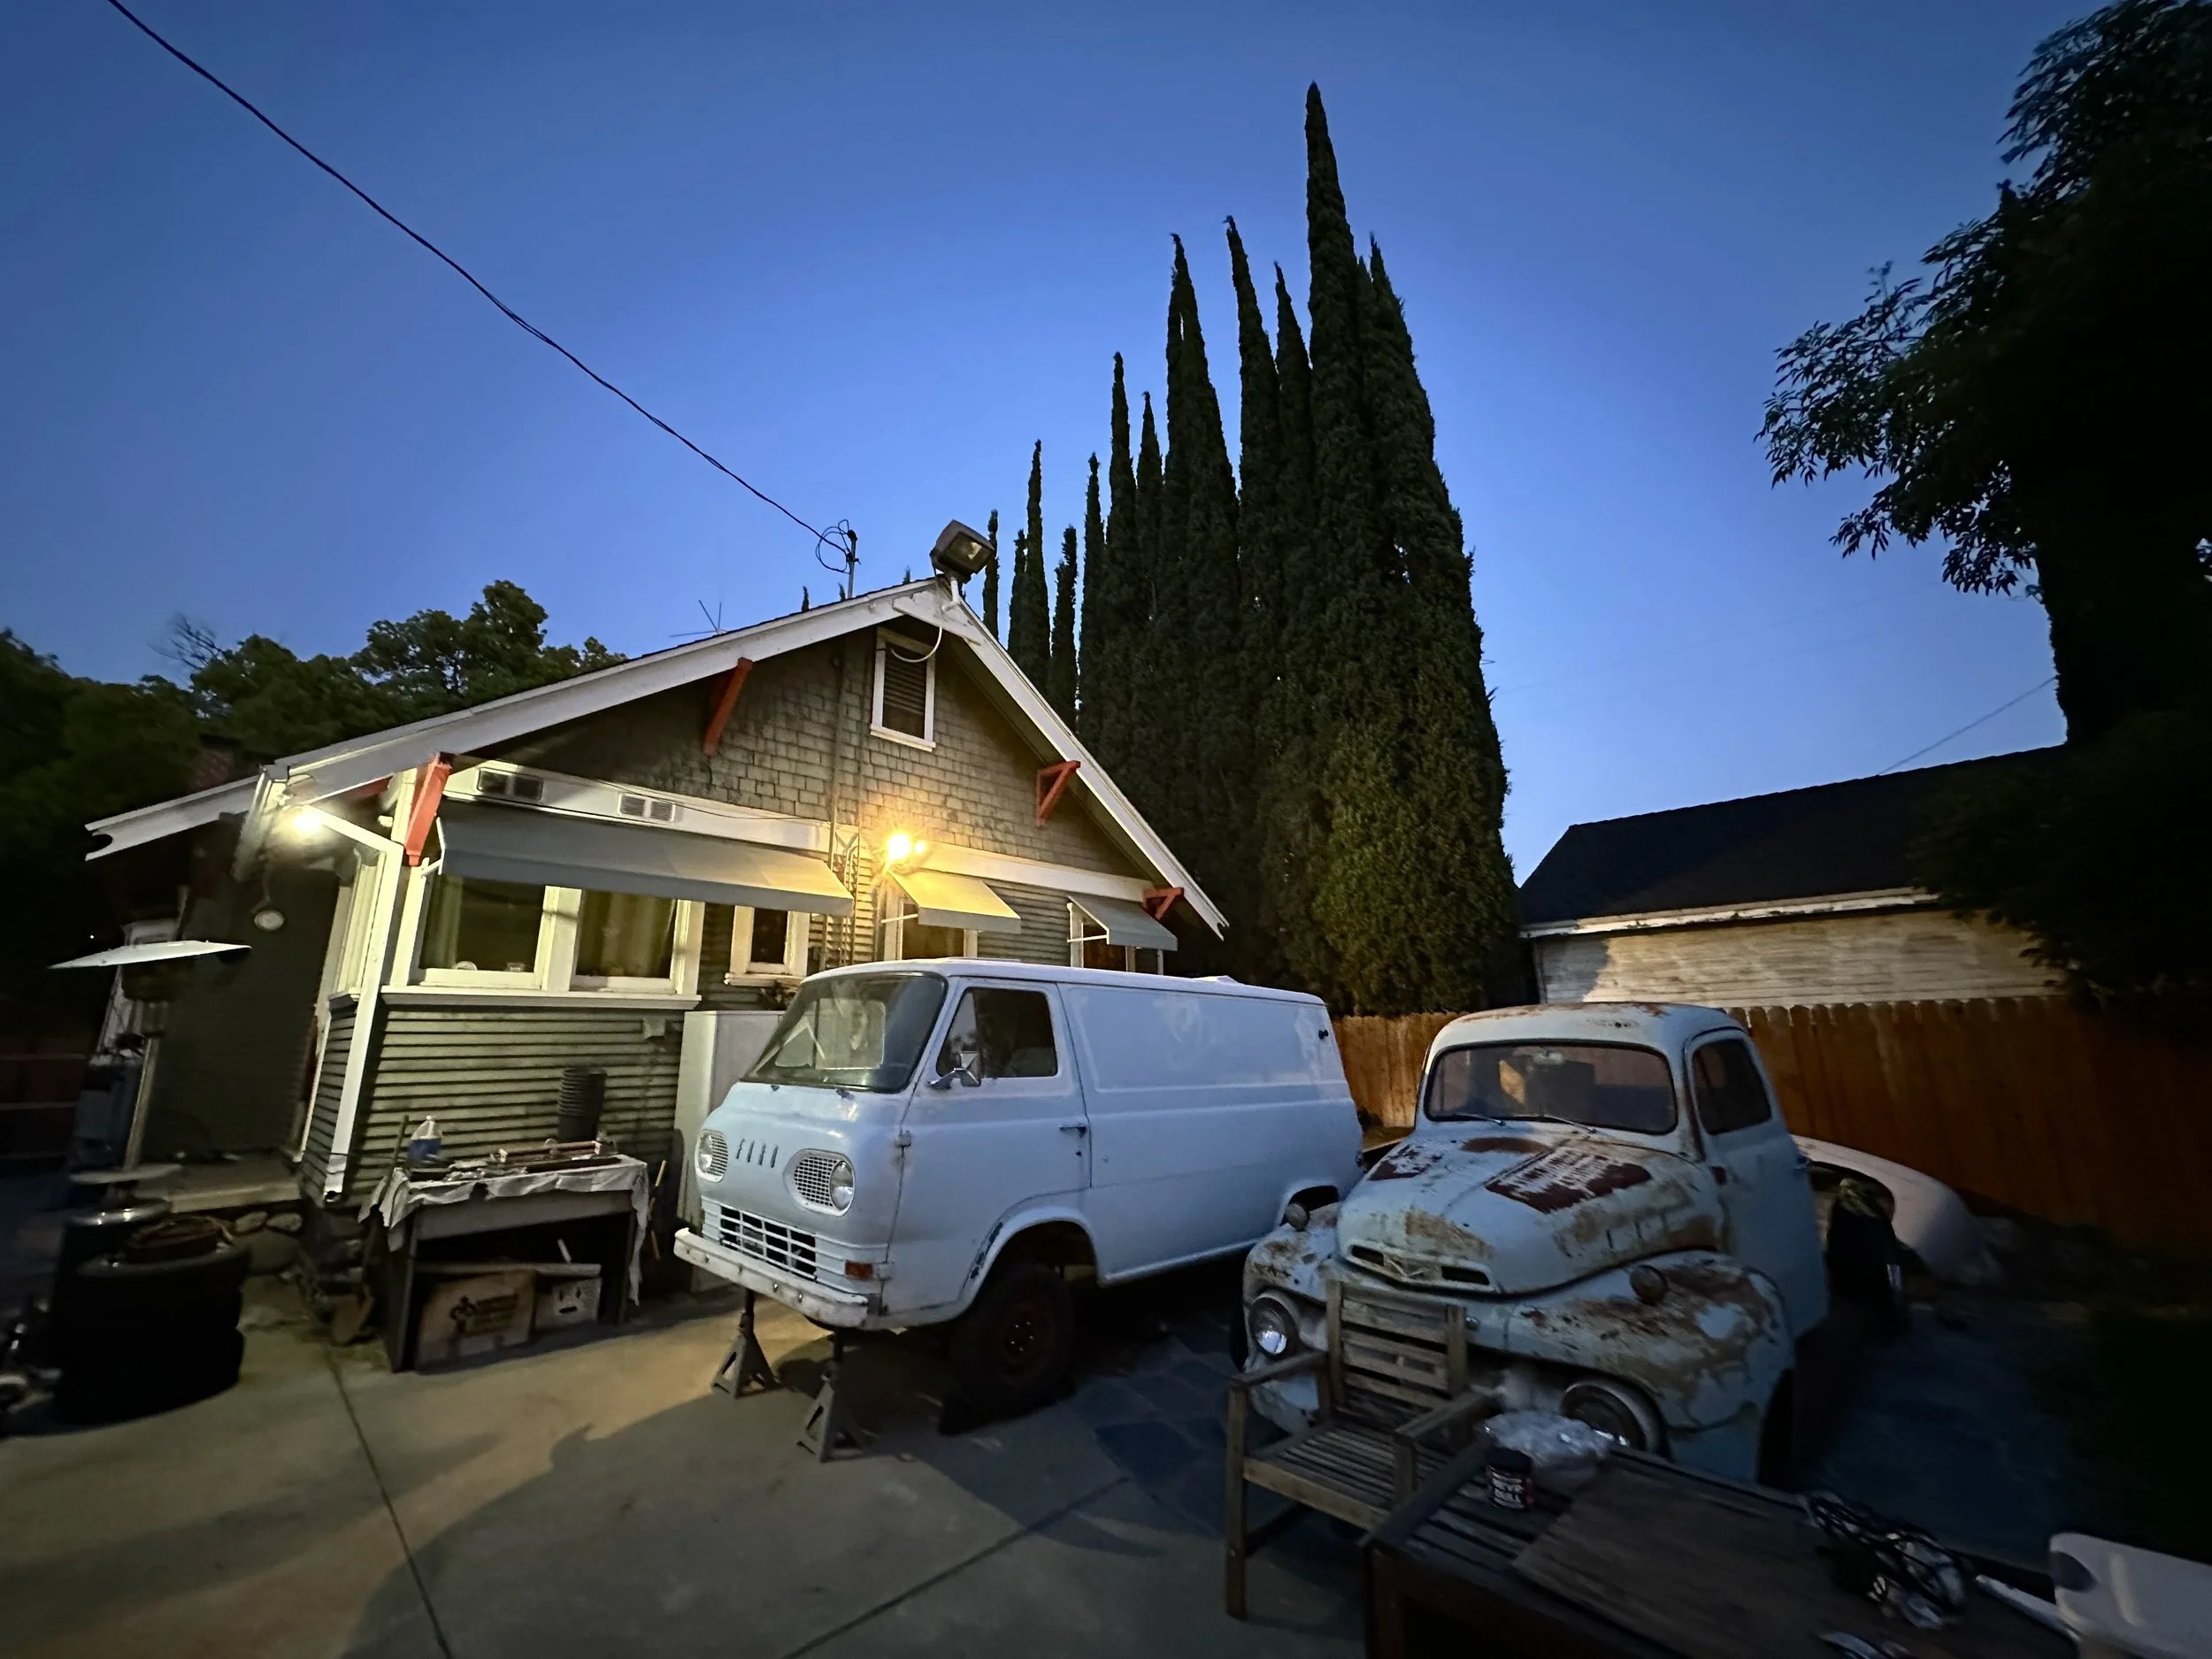
So, I missed my goal of September 1, 2024 by five months. But(!) it’s finally on the road!

Looks pretty much exactly the same! But it’s what you can’t see that has taken so much time and work.
I have been really bad at documenting all that I have been working on – but it has been extensive. To get Buscemi (more on this soon) road worthy so much had to be done that wasn’t fun, glamorous, cool or even visible. But it’s so many of the things that will make this safe (as possible in a 1964 van) reliable and trustworthy. I’ll do my best to add more of the details soon but in the meantime I have made my first longer test drive (story below) and my van has a name…
Saturday, May 3, 2025, after almost exactly a year of tinkering, researching, wire brushing, cleaning, learning, and much swearing, I finally took the '64 for a real test run. There is an event called the RPM Barona Drags down in San Diego county where a lot of amazing people get together and race their hot rods on the drag strip–and it’s awesome. Make some photographs, see some friends and use it as the perfect excuse to hit the road with Buscemi (I’ll explain later) for the first time-so I decided to make the run from Pomona and throw caution to the wind. Barona is about 2 hours away using highways and about 4 avoiding highways. I decided to be bold and try plodding around 55mph on the highway.
3:30am the alarm goes off and for once I am ready and happy to get up (I am NOT a morning person). For days before I have been going over and over everything, checking all fluids, tightening all nuts and bolts and gathering tools and supplies for any possible scenario I could imagine so I was semi-confident. It was dark and cold. I don't have the heater hooked up yet so the big heater between the seats would have to do. I also don't have a steering tube seal so that was immediately ordered when I returned home with a lesson learned (brrrrrrr).
She fired up and purred nicely (ok she fired up and idles a little lumpy right now–need to figure that out) and once I eased the throttle smoothed right out and rolled out of my gate. Lights, check. Brakes, check. Gas, check. Let's do this. I made my way to the highway and eased my way up to 55, listening intently to every creak, rattle and, well, everything to make sure it wasn't going to blow up or fall apart.
All was well but then about an hour into the trip I was chugging happily right along and I started to notice some odd noise from the engine. I glanced down at my temp–165. I looked at my oil pressure–Zilch. Crap.
I took the next exit and pulled off the road to see what I could figure out. I had checked all of the fluids a few days before but when I now checked the oil it didn’t even register on the dipstick. I climbed underneath to look for leaks. Nada. I looked at the engine to see if there was oil everywhere. No more than usual. Hmmmmmm... So I refilled the oil (without a funnel and made a mess) and tentatively tried to start it up again. It immediately fired up and ran as usual. I hopped out to see if there was any white smoke coming for the exhaust. Nope. I'm stumped. Still am.
I eased back on to the onramp and it all seemed ok until I hit the brake. Panic mode. I pressed the pedal much harder and the brakes engaged. For some reason the booster wasn't working as it should. Note to self: Plan plenty of distance to stop until you figure this out! I looked up the nearest WallyWorld (the only thing open this early) and made my way there to use the parking lot to more carefully inspect and pick up anything I forgot (like a funnel). In the morning light I jacked up the van and set jack stands so that I could spend some time really looking underneath. People look at you really funny when you do this. But I found nothing. No drips, no leaks, nuttin. Sigh. I bought more oil just to be safe, the aforementioned funnel, and headed toward Barona.

Safely at Barona
I was only about 45 minutes away but I made it an hour+ and stopped often to check oil level and temps (so convenient to be able to do this from the driver's seat!) and made it to the drag strip without issue. I knew that if I made it to Barona my friends would be there with tools and expertise if needed so I was pretty confident we could address anything needed. I arrived, parked, made a quick inspection and grabbed my camera gear and press pass and walked over to the drag strip.
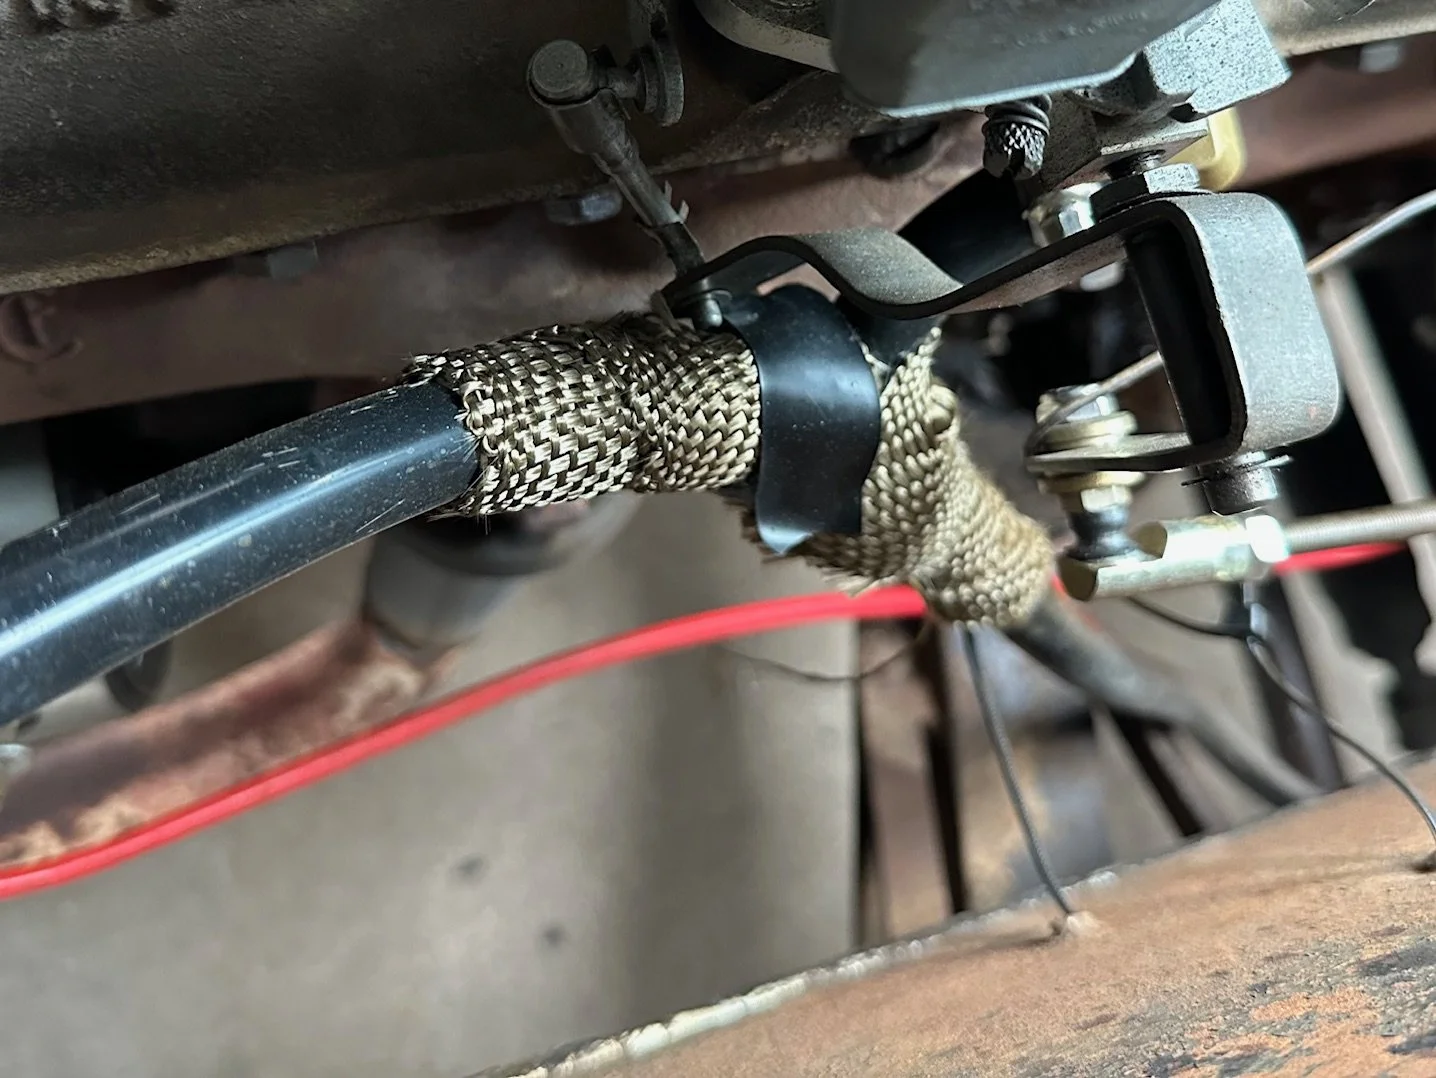
A few hours later I went back over to the van to see if I could figure out why the booster wasn't working. It had to be vacuum right? I inspected the fitting and the hoses for issues. Ahhhhhhh, a hole in the vacuum hose.
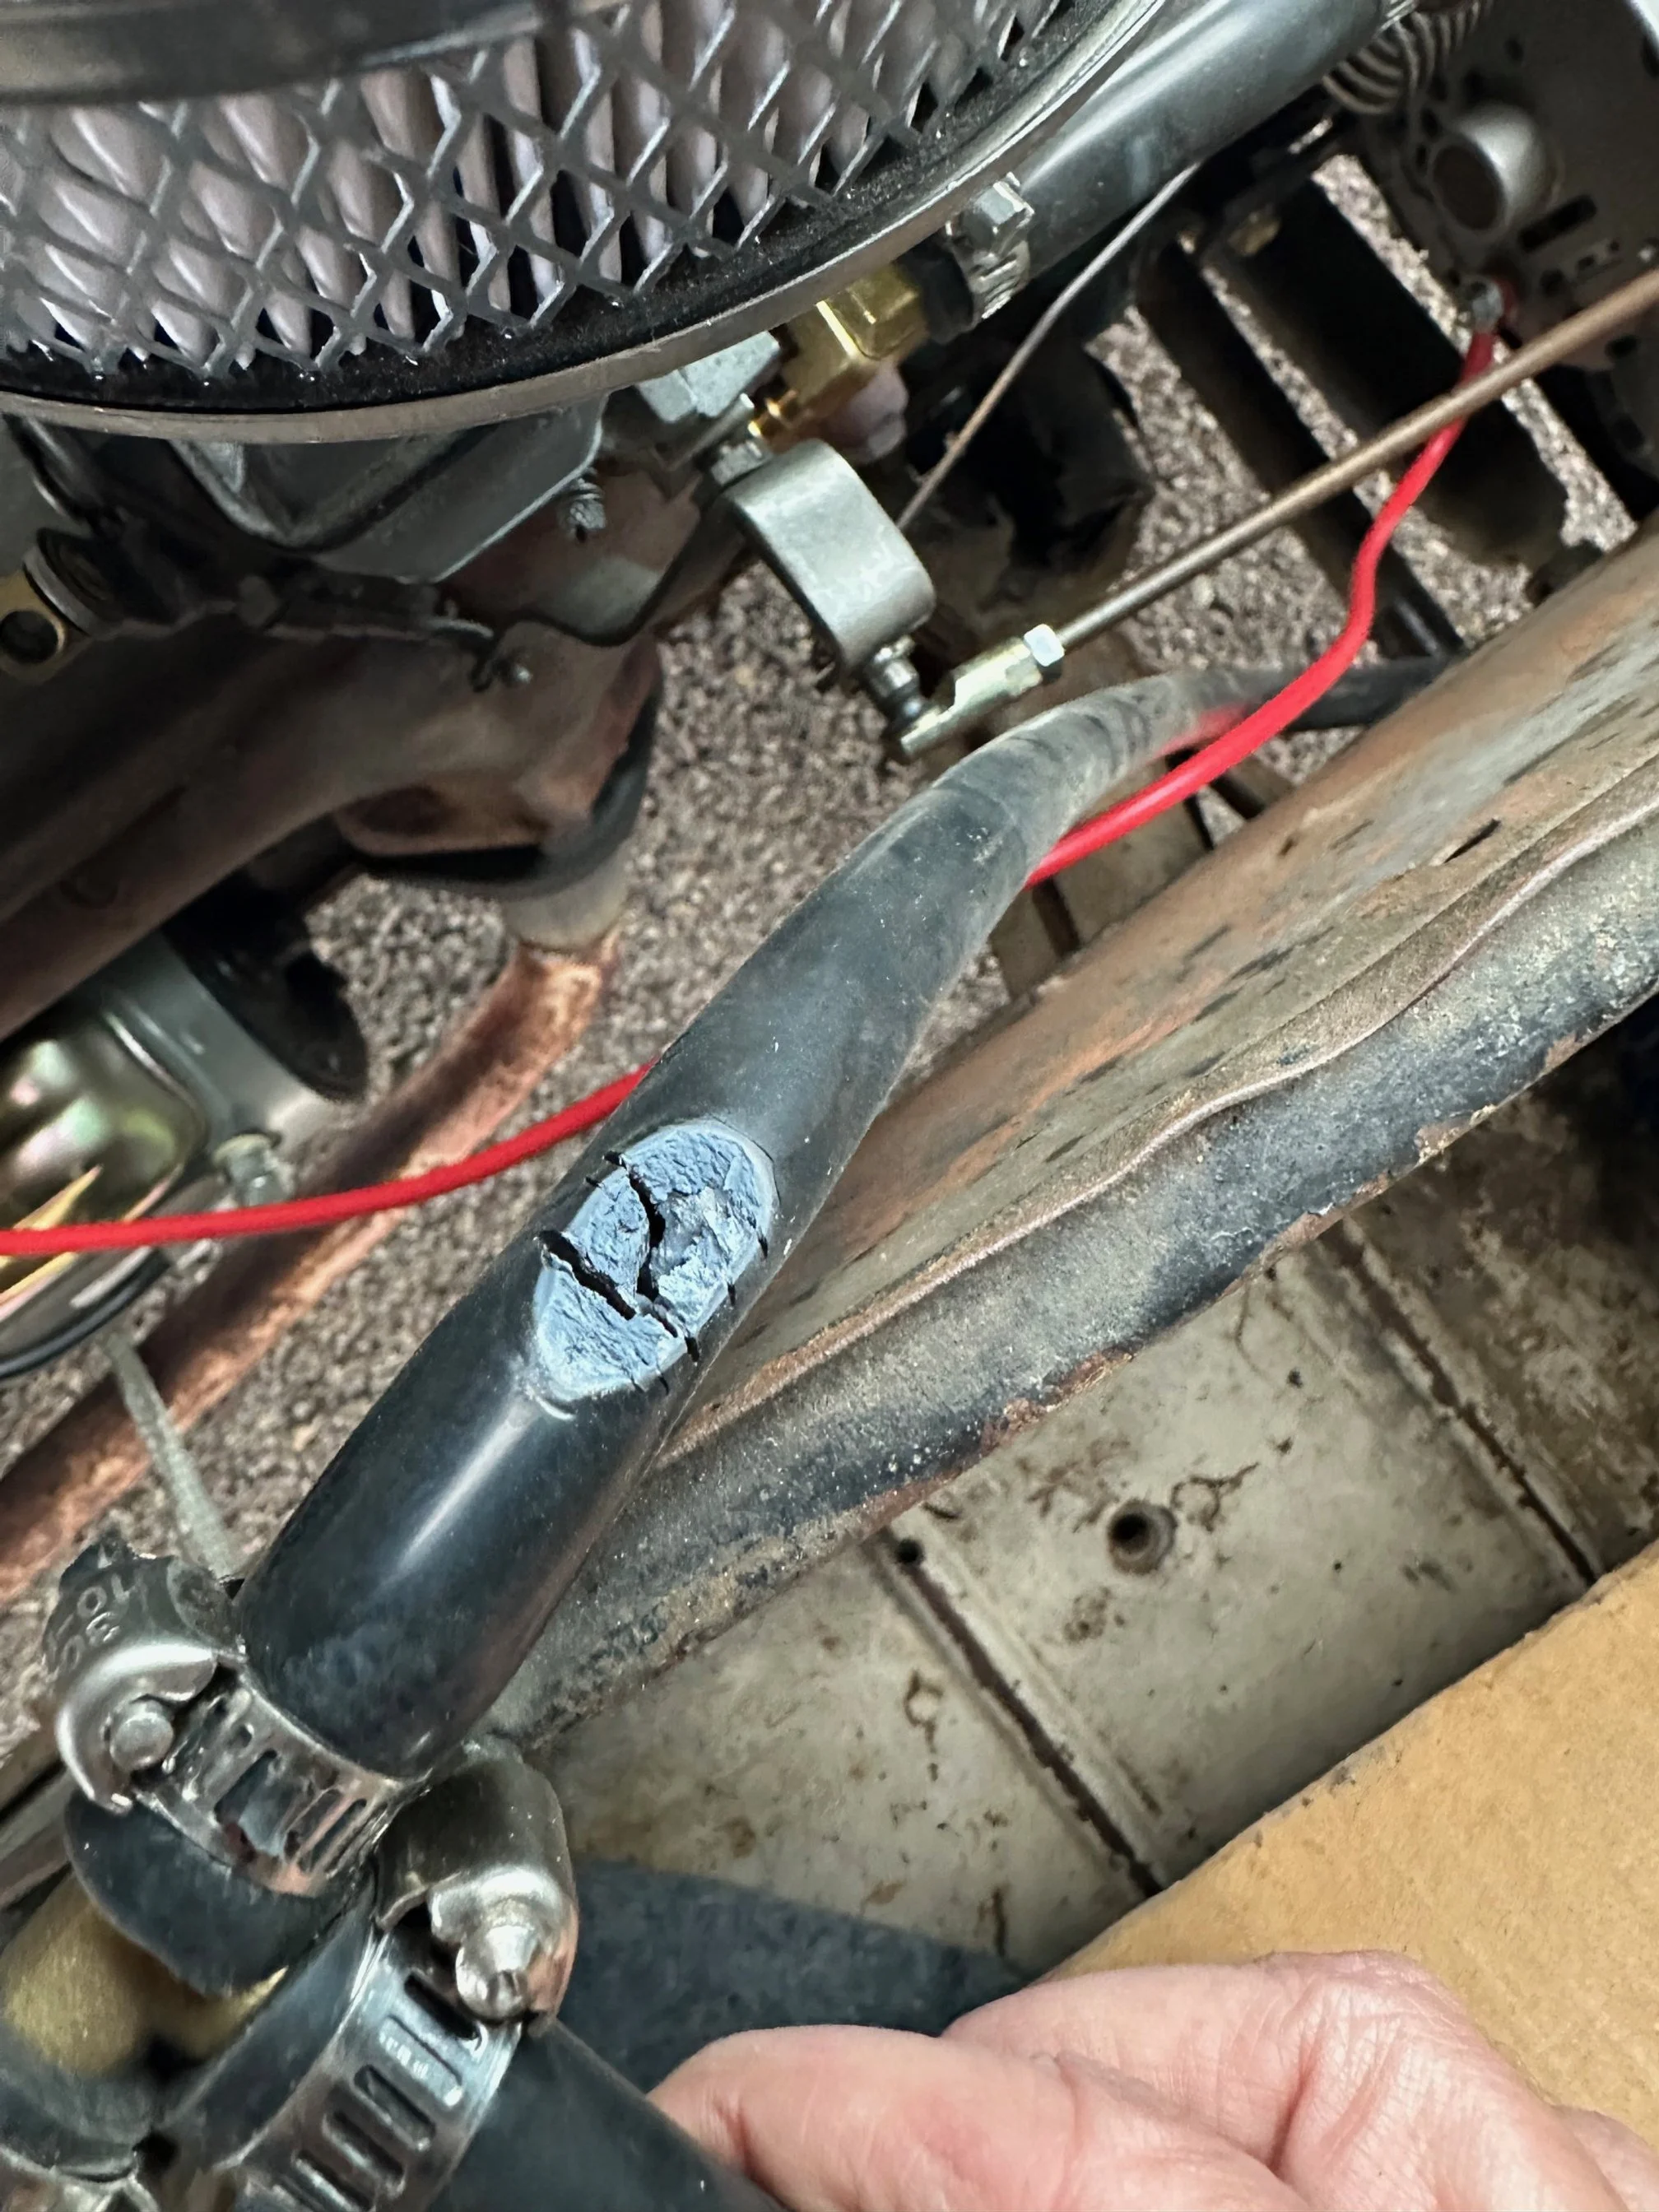
The hose was too close to the exhaust manifold and it burned a hole. Fortunately, cutting the hose short by the hole left enough length to reach the connections required. I reconnected everything and I was back in booster business. Now to make sure it doesn't happen again. I begged some exhaust wrap from my hot rod friends and wrapped the vacuum hose anywhere it was near the manifold and then used a zip tie to hold everything as far away as possible. I'm happy to say that this has worked like a charm so far. Yay me.
Several hours later when the races were wrapping up I decided to head home. I topped everything off (Radiator and oil. Brake fluid was fine) and decided to take the non-highway journey home. This was predicted by GPS to be nearly 4 hours but I was really looking forward to it. I drove out of the gate and headed north down the winding two-lane road.
I love slow trips. I spend more time paying attention to what's around me–the sights, the smells, the neighborhoods and the back roads–and it makes me happy. For 4 hours I drove, only stopping for gas and fluid checks (never had to top off the oil again, weird). Temps never went above 165-170 (I may need to get a 185 degree thermostat?). Things that I noted that I would need to address for any upcoming trips: steering tube seal, shocks (ordered!), seat belts (ordered!), windshield wipers (rain-x is my friend), driveline balance (unwelcome vibrations between 45-55mph) and a bunch of other other minor things. I arrived home safe and sound with a silly, windblown grin on my face, parked Buscemi in the back and called it a day. I love this van.
I neglected to record my trip with photos or video. I had grand plans to do so but instead I was just 100% focused on making the trip safely and successfully. Fortunately, someone sent me the link to an Instagram post with Buscemi way in the background in a photograph of hot rods–proof that I was there! Look closely or you may miss it…

Now, Buscemi. About a week before the big trip I was walking around looking for things I needed to prepare for the trip. As I was looking at the front I noticed that at some point in history something had hit the driver's side wiper "eye" hard enough to knock it a bit sideways. For some reason it immediately made me think about Steve Buscemi as "Crazy Eyes" in in the movie Mr. Deeds. I was thinking about it and it seems to suit the ole' '64. It's a bit wonky, a mite odd looking but yet still somehow super cool–much like Steve Buscemi–so it stuck–for now.

Look closely at the drivers wiper “eye”

More soon…